Easily debug Google Tag Manager auto-event tracking
March 12, 2014
If you’re a self-taught analytics geek like me, you jumped in to Google Tag Manager for the auto-event tracking and have had somewhere between one and one thousand problems, yet you’re unable to find any documentation. Tag Manager has some great benefits and you should probably be using it, but the best feature, auto-event tracking, is still in its early phase. Despite what Google advertises, I wouldn’t say this feature is quite ready for marketers yet. I’m a marketer with a fair bit of analytics and front-end web development experience under my belt, and I’ve had my share of headaches.
But driven by curiosity I just couldn’t let it go. I had a could late nights figuring stuff out so hopefully you don’t have to.
TL;DR: The trick
If you’re trying to set up an event tracking tag with a rule to fire for a certain type of element (link, image, button, etc.) and aren’t having any luck with it even showing up in debugger mode or Google Analytics, then read on.
What we’re going to do is set up a wide net to catch all clicks, and report back the element URL that Tag Manager sees that link as, saving you from guessing. From there you can essentially reverse-engineer your rule. When I say all clicks, I mean it. Every single HTML element it can find.
Some things I’ve had problems with are image clicks, tracking PDFs downloads, and opening things in a lightbox like a photo or a YouTube video.
1. Crete a click listener tag
(If you already have one of these set up to fire on all page, skip to the next step.)
Create a new click listener tag. Name it something (you’ll be deleting this later anyway). When I create listener tags I like to name them Listener – some tag name to keep my list of tags organized.
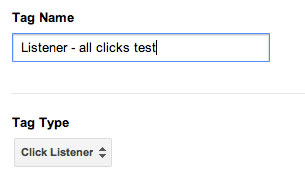
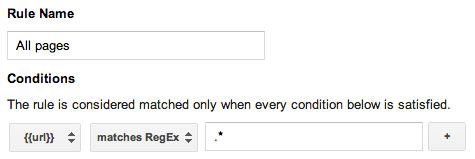
Set the firing rule to All pages – you should already have this rule in Tag Manager as a default.
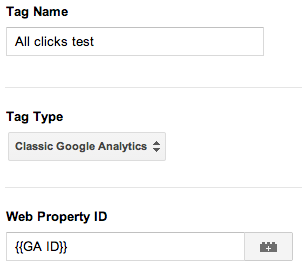
2. Create a Google Analytics event tag
I’m labelling mine as a test because I’m just going to delete it after.
Next set up a rule that tracks all clicks with the gtm.click event:

Finally, set up the event tracking parameters. The Category can be anything you want – label it something you can easily notice and distinguish from other Google Analytics events. You don’t really need an Action label but I do it for good practice.
The important part is the {{element url}} which is an existing macro. This is going to track every click on anything, and report back the URL.
![]()
3. Debug and watch Google Analytics
You can use Tag Manager’s debug mode to make sure your tags and rules are working.
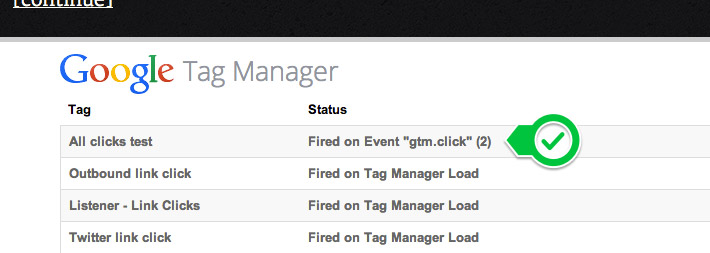
Now open a new tab and log in to your Google Analytics account. In the left-hand menu click Real-Time, then Events.
Click a link on your website. If everything is set up correctly you can watch every click rolling in, so you can click into your newly created “All clicks test” category. Wait a few seconds, click the element you’re having trouble identifying, and then tab back to GA. You should see it pop up, and then you know exactly what element URL Tag Manager is seeing when you click that specific thing.
![]()
Yay! Nothing too complex on my own blog. This method has helped me on client work that I can’t really share, unfortunately.
You can delete this test tag now, otherwise it’ll clutter your reports with too much data. Hope that can help save you some pain. Justin Cutroni’s blog Analytics Talk is a great resource for more analytics and Tag Manager info.